Tuesday, September 6, 2011

Chalking It Up

"I want to paint something with chalkboard paint too!"  That's what I said to myself as I perused the gazillions of design and DIY blogs I subscribe to.  Painting things with chalkboard paint is all the rage.  I think it's cool.  And I like to do cool things.  So I decided I must paint something in my house  with this fun paint.


I had a vision to paint a long, narrow piece of board or cabinet door with black chalkboard paint to hang in my kitchen.  My kitchen style seems to be morphing into the 1930's, French, industrial look.  French cafe's always have a chalk board outside or inside above the bar so my kitchen needed one. 


I went to the thrift store down the street in search of a picture frame with glass or a single cabinet door.  I found a couple frames in the long, narrow shape I envisioned but the stubborn, "I think our junky thrift store goods are gold", guardian of the price point lady that runs the place, wouldn't come down to the amount I was willing to pay.  After all, I was just interested in the frame lady, not the actual portrait of cats dressed up playing poker!  Geesh!  OK, sorry, looks like I needed to get that out.


So as I refused to pay her premium, I stumbled across an empty frame with glass and agreed to pay $5 for it, but really wanted to pay $3.  Hey!  It's a thrift store!  Things are supposed to be cheap.  
It wasn't exactly the shape I wanted but I was too impatient to shop around.  Once I got the frame home and disinfected it, I started mixing the chalkboard paint.  Oh, you thought I was going to buy the chalkboard paint?  Oh no people, I am crafty (or try to be) and I made the paint.  Here's the recipe:


Mix 1 c. of any paint any color with 2 T. of non sanded tiling grout and voila, you have chalkboard paint. Mix really well to prevent lumps.  It will be a bit thick.


I started painting the glass and it took about 3 coats to get a solid coverage due to the slick surface.  Other surfaces, like wood or concrete, cover much easier.  And here is the finished product hanging in the kitchen (with a sweet note left on it by my husband).  I also took a drawer handle, turned it upside down and attached it to the board for a chalk holder. 


The second thing I painted with my chalkboard paint was the inside of my non-working fireplace.  Now I can draw fire, leave  messages or let kids draw inside when they come over.  Cute huh?


Now what are you going to chalkboard paint?

Thursday, July 7, 2011

I Went A Thriftin'

Nothing makes me more giddy than finding hidden treasures for mere pennies at  thrift stores.  I love finding a unique piece to re-purpose or just finding something great on it's own.  It's so fun to me.  Living in NYC, I  don't get to do this much anymore.  One day I did make a big long list of "thrift" stores to visit.  I quickly discovered the inexpensive ones had nothing to choose from and the others were like shopping at the Saks Fifth Avenue of thrift.  They would take all the good stuff from less expensive places and then jack up the prices.  One even had a SECURITY GUARD in it because of how expensive their items were.  And they called themselves a thrift store.  Such a dirty trick.  After that disappointing day,  I left my big city thrifting dreams behind.  I looked forward to the day when I could visit a city with real thrift stores outside this money sucking big apple vortex.


And that day came!  Whoo hoo!  I went to Senoia, Georgia.  Where the people are niiiice and the thrift store pickn' is guuuud.  I also "shopped" at my parents bed and breakfast, The Veranda.  My Mom has always told me that anything she has I can have.  So I took her up on that offer and brought home little pieces of my Georgia home.  Free and sentimental, a beautiful combo.  Here are a few of my little treasures.  Note, I would have brought home a lot more but I only took what I could fit in my suitcase and carry on.


'


This one is my favorite.  I love delicate, curvy glass.  I think it's from the 60's.  The bubbly glass handle on the lid and ball at the bottom top off it's greatness.  Paid $6!  Happy happy joy joy!


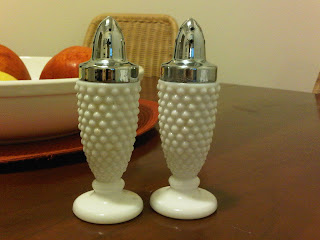
Hobnail.  Don't you just love hobnail?  I love hobnail.  These cute little shakers were priced at $10 and I got them for $5.  


These two cuties I took from The Veranda.  I love the shape of this little pink vase.  If I ever have a daughter, I envision it in her room.  So sweet.  The blue vase it very 1940's, a style I get along with well.  Price, free.


A little 60's number.  The picture doesn't show it so well but it has oranges and greens swirled into a nice chocolate brown.  Quite groovy no?


I don't think this vase shows so well on it's own but I like that it has a pedestal and think once I place some short stem flowers or a plant inside,  it will show nicely. 


Here are a couple sentimental pieces.  The painting of the orange flowers was done by my Mom in an art class.  I took the same class while I was visiting.  She took my painting and I took hers.  The painting of the flowers in the vase was done by my Aunt Francis.  She thinks it's not very good but I love it!  Oh and the weird one in the upper left had corner was done by me one random night in the city.  This will be the start of my gallery wall.


And I saved the sweetest for last.  A picture of my parents from the 70's.  I think I was about 2 when this picture was taken.  They are the ones who make this blog possible.  :)  If they wouldn't have met then I wouldn't be here blogging right now.  It's so sweet to look back at your beginnings and see how far you've come.  Things change, and that's good.  Just like this frame is going to change with my can of spray paint.  But the best thing is, the energy and love of the people inside of it won't. It still remains.

Friday, July 1, 2011

A HAPPY Domestic Goddess In the Making

It's been a loooooog time since I last composed a post for my blog.  My intention was to always write posts about the tried and true recipe's I've discovered, the ups and downs of DIY projects and decor....just sharing fun, lighthearted information.  Then "THINGS" happened in my life that were not fun and lighthearted.  They zapped every ounce of creativity and motivation in my body. Whatever Domestic Goddess image I thought I had,  I didn't want it to be ruined, so I didn't write.  I thought about my blog a lot and felt guilty for abandoning it for so long.  One day I half composed a blog about chocolate cake but just wasn't feeling it so left it to live forever half done in cyberspace.  Finally, I  realized that being a Domestic Goddess In the Making also means being a HAPPY (yet imperfect) Domestic Goddess In the Making.  All people go through "THINGS".  I just had to remember that the difficult times are the best times to transform oneself and to practice being happy no matter what the situation or circumstance.  Easier said than done when in the midst of the hardships, but a practice that must be done if I am to elevate myself.  There's no simple recipe for it, you just do it.   Understanding a concept is much easier than feeling and doing it.  So this time I felt the concept of "Be happy no matter what is going on in life" and that no Domestic Goddess is a perfect June Cleaver at all times.  


Putting this concept into action creates a beautiful home for your soul to live.  And if your soul home is beautiful, your earthly home will be beautiful.  Oprah always said, "Your home should rise up to meet you."  I think that in order for that to happen, you have to rise up and meet your inner garbage, smell it, be disgusted by it, throw it out and put in a new bag.  Perfection is not Goddessness.  Knowing your imperfections is.  Creating my "soul home" will be my biggest and longest Do It Yourself design project that my Domestic Goddess will ever have.  


To end things on a sweet note,  here's the recipe for that super yummy vegan/parve chocolate cake!


1/2 c. coco
2 c. white flour
1T. baking powder
1 t. baking soda
1/2 t. sea salt
1/2 block soft tofu (pressed)
1 1/4 c. canola oil
1 1/4 c. maple syrup
1 T. vanilla
(the following I don't use but are optional)
2 T. black cherry concentrate
2  T. rum
1/2 t raspberry vinegar


-Sift dry ingredients together
-In food processor or blender, blend tofu with wet ingredients 
-Mix wet and dry ingredients together
-Line 2 8" cake pans with parchment or coat lightly with oil
-Bake for 15-20min at 350 degrees


My Presentation:
-Once the cakes have cooled, I spread a layer of Raspberry preserves between the two
-I then make a shiny ganash (soy milk and parve or vegan chocolate chips melted then cooled)  
 and pour over the cake


Enjoy!

Tuesday, April 5, 2011

What Will Your Home Say?

One of my favorite home trends of the season is typography.  The hanging of words, phrases, numbers or letters in ones home.   To me words have power, even when they are just hanging on the wall.  I recently purchased a "LOVE" print and framed it for my living room.   Has it been hung yet?  No.   But I love my "LOVE" print.   


A few weeks ago I stumbled upon this super cute custom birth announcement, from trendypeas on etsy, which I quickly customized for a sweet little girl who came into the world last month, Miss Abigail.  Isn't it funny that the example picture has the same name??  I think this will make a lovely addition to her pink and green nursery.  


Here are a few more examples of typography that I think you might enjoy...


Yes, I do love you blogs and coffee.  Maybe this will be my next purchase.  So what will your home say?

Thursday, March 31, 2011

Packin' Heat

Packing up to move to New York required A LOT of downsizing.  My husband was the merciless "editor-in-chief" of all my belongings that I would be taking.  I painstakingly gave away shoes, clothes, furniture, home accessories, books, craft projects, you name it, I purged it.  But there was one thing I was NOT going to purge.  A thing I had to take to comfort and soothe the crafty side of my domestic goddess nature.  And that thing was my glue gun.  I was packin' the heat no matter what!  This was my weapon of creation and I needed it with me.  In no time I was gun slinging glue all over my NYC apartment.  Ok ok ok, I'll stop with the gun references.


The plain white valance I had made while in LA was screaming, "Decorate me!"  So I did with a lovely black braided cord.  You can't see the pattern of the braid but it adds a really nice detail to my black and white kitchen.  (I desperately need to find my camera that has been misplaced in our move!) My Libra-ness likes the matchy-ness.


Once the valance got an aesthetic lift, the lamp shade in my bedroom was feeling a bit plain jane. So across town I went to the best trimming store in the city, M&J Trimmings.  It can be really overwhelming in there.  So much to choose from, it's hard to decide. My Libra-ness struck again.  But I finally made a decision after about 1 hour.  Haha.


I chose two ribbons. One a silvery grey with a white stitching and one a smoky lavender. I eventually want to do my bedroom in these colors.  


Since I am no Martha Stewart, remember I am a domestic goddess IN THE MAKING, I had a problem with the edges.  The edges of the lamp had a slanted angle to them so I couldn't just wrap the ribbon directly around the shade. I matched up and measured the grey ribbon as best I could and to hid a bit of the flaws made a criss cross pattern with the smaller ribbon on all four corners.  An organic fix it that turned out cute. 


Before
After


A subtle difference that makes me happy.


And last but not least, the candles.  I had 3 white pillar candles in my bathroom that just got lost in the white etagere.  But a $1.50 worth of black satin ribbon took care of all that.  It's so simple.  I just glue gunned the ribbon on to the candles, took 2 fancy looking brooches I had in my jewelry box and stuck them into the front.  It's not permanent so I can always take them out if needed.  


Before
after
see how they stand out?

These were all little projects I completed in minutes.  It doesn't take a lot of time to add these little details and create big impact to things in your home.  Is anyone else out there packin' heat and slingin' glue?  If so, love to see what you've created.

Monday, March 28, 2011

3 Cup Peach Cobbler for 3 Miriams

My 3 Miriams turned into 2 Miriams at the last minute, but the title of my blog had already been pre-determined so it stayed.   And yes, I invited 3 friends over for tea who all happened to be named Miriam and all Israeli.  So I was thinking, what would I make and serve to my 3 Israeli Miriams with their tea?  Peach Cobbler of course!  My southern families famous "a cup, a cup, a cup" Peach Cobbler recipe.  It's so delicious and so simple and looks as if you spent hours baking it up.  My parents own a Bed and Breakfast called The Veranda where they serve this for dessert at breakfast with ice cream no less! True decadence southern style. 


The Veranda
"A cup, a cup, a cup"  Peach Cobbler got its nickname because the recipe calls for 1 cup self rising flour, 1 cup of sugar and 1 cup of milk.  Mix those 3 things together with a can of peaches (including the syrup), a stick of melted butter and bake at 450 degrees for about 35 minutes, or till the top is a bit brown, and ta-da! You have super yummy, crowd pleasing dessert.  It was a hit with my Israeli Goddesses.  One even left with the recipe.  Shalom Ya'll


Cobbler after we dug into it
Tea with Nana (mint)


Sunday, March 27, 2011

Challah Back Girls!

Sorry, couldn't resist the cheesy title.  After posting my first blog on Challah,  I was asked by one of my fellow Goddess, also named Sarah, if I could show her how to make this delicious bread.  Wow!  How cool!  Someone wanted me to show them how to make Challah!  I was flattered and excited to share the experience and to also do some catching up on girl talk.  So last Friday Sarah came with her flour and yeast in tow and we got down to business.  It was a rocky start as neither of our yeasts rose to the occasion.  I learned that yeast is like Mama Bear.  The water cannot be too lukewarm or too hot.  Ours was too hot and dead in the water.  Thank goodness we had exactly enough to re-do. Yeast can be finicky so it's always good to have extra on hand.   Half cool and half hot water works like a charm.  Once we overcame the yeast scare we mixed in our other ingredients and went straight into the arm workout, kneading.  Here are our perfectly round kneaded doughs.  Mine is on the left and Sarah's is on the right.  


Another interesting discovery I made was that the textures of our doughs were different.  Mine had a consistency more like play dough (not as thick of course) and hers was a bit more soft and pliable. This was due to the flour.  Here is a link from Cooks Illustrated that delves into the subject of flour provided by my super smart and beautiful Aunt (although 4 years my junior) Cassie. I was using the Trader Joe's brand whole wheat flour and Sarah used a different brand I can't remember the name, only that it started with an H.  When sifted, more of the wheat bran of my flour went through the sieve and less of the bran from hers.  


Never the less they turned out spectacular!  Sarah's Challah is on the left and mine is on the right.  Beautiful right?  So the moral of the story is:
1.  Make sure the water temperature for your yeast is juuuuust right
2. The brand of flour you use can make a difference in texture
    and
3. That making Challah for the one's you love always makes them feel special and gives you the  warm fuzzies inside. 


Thanks Sarah A. (omg she has the same last initial as me too! haha) for coming over and kneading bread with me.  I felt like a proud Mama.  Keep up rollin' out the dough!


Challah!